Monday, April 30, 2012

Breakfast Bars & Fruit and Nut bars

Today was a day of baking.  B wanted more Fruit N' Nut bars and I found another recipe for breakfast bars so I decided to make both.  They use some of the same ingredients so it wasn't too crazy and hectic to do.  Also, I love being in the kitchen making and trying new things so this was nice for me. 

From the Breakfast Bars:
I found these at Elana's Pantry.  If you haven't checked out this site before go now!  It's great and has wonderful recipes. 
For the ingredients, I used:
1 ¼ cup blanched almond flour
 ¼ teaspoon sea salt
 ¼ teaspoon baking soda
 ¼ cup EVOO oil (because that's all I had on hand... the original recipe called for Grapeseed oil)
 ¼ cup agave nectar
 1 teaspoon vanilla extract
 ½ cup unsweetened shredded coconut
 ½ cup pumpkin seeds
 ½ cup sunflower seeds
 ¼ cup almond slivers
 ¼ cup cranraisins (the original recipe called for raisins but I don't like them)

I combined the almond flour, salt and baking soda in a small bowl
Then I added the oil, agave and vanilla in the Kitchen Aid mixer. 
Add the  dry ingredients into the wet ingredients
Mix in coconut, pumpkin seeds, sunflower seeds, almond slivers and raisins
The recipe called for a 8x8 inch Pyrex baking dish but I don't have one so I used a 5 x 7 baking dish
Press the dough into the baking dish, I just used a spatula to even it all out in the pan.
Bake at 350° for 20 minutes
My goodness this smells so GOOD!!!  They were still a little warm when I cut them so they feel a part but still will be a delicious snack throughout the week.


The Fruit N' Nut Bars (Coconut Cherry Bars). 
Again, I found these at EveryDay Paleo which is a great recourse through the journey of Paleo. 

Recipe calls for:
1 cup raw almonds
½ cup raw pecans
12 Medjool dates
1 cup dried cherries (unsweetened)
2 tablespoon coconut oil
1/2 cup finely shredded coconut flakes (unsweetened)
¼ teaspoon salt

This time around I soaked my dates in pomegranate juice overnight to add a little more flavor.  I only own a mini chopper so I have to do all of this in parts which is simple enough.  I first chop the almonds.  Then the pecans with the salt.  I pour both into the Kitchen Aid mixer and stir lightly to mix.  I then have to chop of the dates after draining the pomegranate juice.  This turns into a thick gummy texture.  Add to the Kitchen Aid but do not mix.  Do the same with the dried cherries (I used cranraisins since I didn't have cherries on hand and these works just fine) with the 2 tbsp on coconut oil.  Once chopped, add to the Kitchen Aid mixer.  Dump in the 1/2 cup of coconut flakes and the Kitchen Aid do its magic.

Once mixed, grab a cookie sheet or just place some saran wrap on the counter top.  Dump the mixture onto the saran wrap and add another layer on top.  This allows you to roll it out without getting all sticky.  I put mine in the fridge for about 30 minutes to harden a smidgen but this is not mandatory.  Cut it up and enjoy!  They aren't the prettiest looking things ever but the are mighty tasty and filling... which is all that it's about, right?!

Thursday, April 26, 2012

Paleo tortilla FAIL

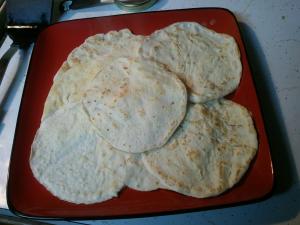
There was this lovely looking picture on my pin board in pinterest that showed tortillas.  I was feeling a little carb-acious (is that a word?) today so I decided to venture into a new recipe and try paleo tortillas and make some shredded chicken for Mexican dinner night.  Let's just say, I ended up eating something more like a tostada than tacos tonight.  The photo to the right is the picture that I saw and what I was aiming to make.  The recipe is here.  As you can see below... that is NOT at all what mine turned out like.  The recipe went a little something like this:
1/4 c coconut flour
8 large egg whites
1/4 tsp baking powder
1/2 cup water
coconut oil to use on your frying pan (aka my cast iron skillet)

All you do is mix all the ingredients together, heat the pan, and then pour about 3 tbsp of batter into the heated pan.  Can't be too difficult, right?  Well, leave it to me to make anything simple quite complicated.  The directs say to then tilt and swirl the skillet to spread out the batter into round thin tortilla shapes.  I used a spoon to thin them out.  The batter quickly began getting stuck onto the skillet so the first one had its far share of rips in it.  This is why I don't make pancakes either.  I cannot master the heat to oil to batter ratio that makes it easy to flip and look appealing all at the same time... I digress though...

The "tortillas" turned out more like a pancake.  They were thicker and clearly more browned than the lovely photo above.  The texture and taste were good... they just weren't tortilla-esque.  I decided we would still do Mexican night and make tostadas instead.  Now, I know tostadas are supposed to be crispy and these were not but I still thought it would be yummy.  I topped mine with shredded chicken, sauteed mushrooms, onions and red bell peppers, added some chopped lettuce and topped with 1/2 of an avocado.  The meal itself was filling and tasty.  Maybe some other day I will decide to try the tortillas again but until then, I guess I will be fine with no 'bread-like-substance'.  It was a thrilling thought while it lasted.   If you have the secret to perfecting the perfect tortilla, please let me know!!  I am eager to learn.  Thank you and enjoy your eating. 

Friday, April 20, 2012

Paleo "candied" pecans (and I added walnuts too!)

Holy moly, may I say most delicious snack/dessert to have on hand!!!  These suckers smell delicious from the moment they go in the oven and taste even better when they come out.   I was in the mood for something sweet but didn't want to make homemade paleo ice cream so looked up online "paleo candied pecans".  I stumbled upon this website and decided to give it a try.  I followed the recipe to a "T" except for the fact that I didn't want to use just pecans.  I love pecans but had some walnuts on hand and at that time they sounded good "candied" too so I decided to give them a try. 
I preheated the oven to 250.  In a large bowl I added one egg white and 1 tbsp of water.  I whisked it for a good minute with a fork until it had a nice sheer frothy look to it.  I dumped two cups of pecans and two cups of walnuts in the egg bath and used a spoon to make sure all the nuts were bathed in the egg and water.  In a large Pyrex mixing cup I poured the 2/3 cup of honey, 1 tsp salt & 1 tsp cinnamon.  I also added about 1/2 tsp of vanilla extract for some extra flavor.  Add the honey mixture to the bowl of nuts and mix thoroughly.  Place on a baking sheet lined with parchment paper and smooth down so that none are clumped on top of each other. 

Every 15 minutes for the next hour and fifteen minutes let the nuts roast away.  Every 15 minutes it is helpful to mix the nuts around on the parchment paper with a spatula so that they don't stick onto the paper.  At the end of the 1 hr 15 minutes, place into a glass bowl so that they don't cool on the parchment paper and stick there too.  Let cool and enjoy.  I have been snacking on them slightly warm and they are absolutely delicious.  They go in the fridge at night and are quite tasty chilled too.  Even though we aren't close to a winter holiday (which these remind me of) they are absolutely wonderful to snack on year round!  Enjoy.

Thursday, April 19, 2012

Paleo Scotch Eggs

I've been reading about scotch eggs since I started Paleo.  I must be honest I have never heard of them nor seen then before now.  I googled Paleo scotch eggs and found this website.  A scotch egg is pretty much a hard boiled egg wrapped in ground meat and then baked.  I have also found recipes where you 'fry' them a bit on the stove and then pop them in the oven.  This recipe just involved baking so that is all I did this time around.  The recipe also mentioned that you could use breadcrumbs if you want on the outside.  I decided to try it out with Gluten Free Cornmeal as I tend to like a crunchy texture. The idea of just meat didn't settle with me. 

I had already pre-boiled the hard boiled eggs and thawed the ground turkey so this recipe did not take long at all to throw together.   All you do is remove the shell from the hard boiled egg and grab a handful of meat.  Place the egg in the center of the meat and start working it into a ball.  It's that easy.  All you have to do from there is dip the ball into the egg bath so that the gluten free cornmeal thoroughly sticks to the turkey. 
I did read in the instructions that you need to place the pre-cooked scotch eggs on some sort of drip tray so that the juices can drip from the meat while cooking.  I just use a cookie sheet lined with foil and placed an unfolded cooling rack on top.  This worked just fine. 

Have the oven pre-heated at 350.  Once the scotch eggs are prepped and ready to be cooked, place in the oven for 35 minutes.  When I took them out I didn't feel like they looked fully cooked.  We cut one open just to make sure and it was just fine.  I still think I might flash fry it before I eat it.  I understand they are good warm or cold but I'm not one for cold meat either.  One scotch egg can be a whole meal (to me).  They are quite hefty.  Moral of the story, they turned out fine and I'm glad I tried them...however I don't think I will be making these again.  They really didn't do that much for me. 

I have enjoyed exploring Paleo for this reason.  I am trying things I would NEVER have tried in the past and learning more and more of what I like and don't like.  This has been a fun journey so far.  Thank you for journeying along with me. 

Wednesday, April 18, 2012

Today's Paleo-ized bfast & dinner

This morning I planned to make my breakfast and prep dinner at the same time.  I am continuing to practice my Crock Pot skills.  I'll tell you the truth, I still have a ways to go... but at least I'm trying.

For breakfast, I decided on sweet potato hash and eggs with 1/2 of an avocado.  The sweet potato is quite easy to put together although you will have to use your forearm muscles to grate the sweet potato.  I tend to buy two or three sweet potatoes at a time and will grate all of them at one time just to have it all prepped.  I have found that it lasts just fine in the refrigerator (in an air tight container) for a week or two. 

 I put about 1 1/2 - 2 cups grated sweet potato in a bowl, add some green onion and then plop in an egg to 'bind' it all together.  You can also add a splash of vanilla extract and cinnamon for a nice sweet treat.  Before I mix it all together, I warm up my cast iron skillet with a spoonful of coconut oil on medium-high heat.  I then just use my hand, but of course you can use a spoon or spatula, to mix it up.  I find it is just as easy to use my hand and then add it to the warmed cast iron.  I forgot to take a picture of the final product but trust me, you will not be disappointed with this meal.  I tend to make a large portion and put half away for dinner that night or breakfast the next morning.


Now, on to dinner!  I went with the crock pot pork chops again.  They were so tasty the last time that I just had to make them again.  I had thawed the pork chops in the fridge the night before so they were easy to work with.  I used 3 pieces of turkey bacon per each chop.  I layer the bacon just slightly and only use one tooth pick to hold it all together.    Turn on the broil setting of your oven.  When ready, place your chops in a baking dish and cook the bacon (crisps the bacon a bit which is what is intended) for about 15-20 minutes in the oven.  Eye the bacon to determine if it is crisped enough.  You don't want it to be blackened but you also don't want it too soft because they it gets soggy in the crock pot... and I just find that nasty.  I added 1 cup of beef broth (because that's the only broth I had in stock right now) and then some pineapple juice to the bottom of the crock pot.  Place the two broiled chops into the crock pot and smoother with pineapple (you can do rings, chunks or shredded).  I leave my crock pot on warm when I leave for work as I don't work a job that I can guarantee just an 8 hour day.  On this day, I ended up being gone for about 10 hours and the warmed crock pot worked just perfectly.  B loved the chops... however, when I cut into it I had one of  my meat-disgust moments and decided not to eat it.  I have done so much better about eating meat but I still run into those moments where, no matter how good it looks, I'm just not in the mood. 

Monday, April 16, 2012

Paleo chocolate chip cookies

Oh my goodness, these are a hit at my house!  My mentor at work also is doing Paleo with his family so he has become such an asset to me in this part of the B & C food journey.  He sent me a recipe for Paleo Chocolate Chip Cookies on Monday and said they were absolutely delicious.  Of course, when I got home from work on Monday, I HAD to try them out.  I did make a full batch but only baked 12 cookies.  B & I both don't always do well with portion control when it comes to dark chocolate.  :)  We have the dough handy if we need a couple of cookies here and there after a meal but this makes us heat up the oven and wait for them to be baked each time.  This has been a helpful tool for me in choosing wisely the foods that I need vs. the foods that I want.  So... let's get down to it, how do you actually make these delicious balls of goodness!?

Ingredients:
3 cups blanched almond flour
1/2 c coconut oil
1/2 c maple syrup
2 eggs
1 tsp baking soda
1 tsp salt
1 tsp vanilla extract
1 1/2 cups Enjoy Life semi-sweet choc chips (I used choc chunks instead)

Preheat oven to 375 degrees
First, I added the dry ingredients to my handy dandy KitchenAid mixer.
In a small bowl, I combined the eggs, maple syrup and vanilla extract and mixed thoroughly.
I then added the wet ingredients to the dry in the KitchenAid and mixed until blended
The 1/2 c of coconut oil went into the microwave for about 15 seconds to turn to a liquid substance and then was poured into the KitchenAid batter mixture.
Slowly, I added the chocolate chunks.
Once the mixture was ready to go, I took out my cookie sheet lined with parchment paper and went to work on our one dozen cookies that would be baked.  I have a cookie scoop that portions on the cookies perfectly. 
Bake for 15 minutes... and then voila!  Perfection in Paleo baking!!
Let cool for a couple of minutes then enjoy... you know I did!
I had two cookies out of this batch... Brian ate 10!!  He was not messing around.  Since our first batch, I have used the refrigerated cookie dough to make 3-6 cookies at a time.  I still preheat the oven to 375 degrees and bake for 15 minutes.  They turn out absolutely delicious each time around.  :) 

Sunday, April 15, 2012

Easter Trifle

Easter was wonderful for many reasons.  One of those was trying out a new dessert.  My mom had mentioned trying out a trifle.  They always look so pretty when they are first prepared! :)  This past weekend was full of fun social things... which is a rarity for us.  We had the opportunity to go to a baby shower, meet up for dinner with a couple after that and then head to a sports bar for more social hour with another couple.  Sunday was packed full of church, lunch with friends and then dinner with other friends!  The trifle came in handy to be able to offer as dessert at both friends' homes on Sunday! 
To Make:
2 cartons of fresh strawberries, tops chopped off and then thickly sliced
12 oz container of Lite Cool Whip
3.4 oz instant French vanilla pudding mix
Bag of dark chocolate chips
Coconut shreds
One round container of angel food cake, cut into cube size pieces

Mix the cool whip and the pudding mix together... it will turn a creamy beige color.

Place about quarter of strawberries on bottom of trifle bowl
Lightly cover strawberries with a handful of coconut shreds
Lightly cover coconut with dark chocolate chips
Place about quarter of the angel food cake cubes on top of strawberry/coconut/choc chips
Add large dollop of cool whip/pudding mixture and spread around angel food cubes

Repeat about 3 times or until you make it to the top of the trifle dish.

Once you reach about 1/2 inch from the top of the bowl, add your final layer of cool whip and then arrange remaining strawberries, coconut shreds and dark chocolate chips to make it look pretty!

Eat and enjoy!  I left mine in the fridge for about 3 hours after assembling it before we headed to our friends' house for lunch.   It made for a nice cool sweet treat. 

Wednesday, April 11, 2012

Shout out to Pinterest once again...

Oh my goodness this is good!  This is now my second time to make it and it tends to last about 4 meals!  Primal Palate is another website that I tend to venture to often to find yummy new recipes. 
Their recipe calls for:
1 Tbsp Sesame Oil, toasted        1 Tbsp Garlic, minced                  
1 Tbsp Ginger Root, minced      
1 lb Chicken Breast, Skinless , cubed                                               
1/2 cup Water Chestnuts            2 cup Broccoli, chopped             
1/2 cup Shiitake Mushrooms, stems removed and cut in half
1/4 cup Almonds, chopped         1/4 cup Celery, chopped               
1/4 cup Green Onion, chopped    2 cup Shredded Green Cabbage 
1/4 cup Raw Coconut Aminos     1tsp Sesame Seeds

I definitely DID NOT use all of this.  I started heating up my large cast iron pan with a spoon full of raw coconut oil.  Then I added 2 cups of chopped up broccoli.  Threw in 1/2 cup of diced up portobello mushrooms (I grind them up so Brian doesn't realize that I added them in... shhhhh).  1/4 cup chopped almonds, 1/4 cup chopped cashews and 1/4 cup chopped pistachios.  (I didn't have any water chestnuts so I added more yummy nuts.) 
1/4 cup green onions & celery (equal parts) added in and then let it sizzle just a bit.  I chopped up a bunch of cooked chicken breast the first time. (I used shrimp the second time.)  Once this was all mixed together and warmed, I added the 2 cups of shredded cabbage and garlic.  Let it heat up and soften just a bit and then serve.

This is delish!!!  I hope you enjoy it.  I tend to saute more mushrooms and onions and add them to the top of mine for some extra flavor!  I don't own nor plan on buying at this time coconut aminos (I have absolutely no idea what that is) nor ginger root or sesame oil.  Just throwing that out there...

Blessings to all! :)

Not Paleo Stuffed clams and leftover Paleo Lo Mein

When I went to Sprouts the other day, they had these huge stuffed clams for $1.69 a pop.  Fresh minced clam and bread crumbs with some seasoning and I was sold.  All I needed to do was cook them in the over for 15 minutes at 450.  These are definitely NOT paleo-approved but my goodness, they looked too good to pass up. 

We each served ourselves two stuffed clams with a side of leftover Lo Mein but neither of us were able to finish our meals.  This was a hearty and delicious dinner.  It was also a nice change from the normal meals we eat.  Sprouts also had large lobster tail on sale this week so we stocked up on that. 
Though the entire meal was not Paleo-approved I don't think either of us regret a single bite of this delicious meal!

Monday, April 9, 2012

Chicken salad with no mayo

Can you tell that this was my lunch at work?  I normally get weird stares or comments about the food that I bring to work.  I have never really been an out-to-eater and I very very very rarely will go out to lunch.  I'm thankful I have always been in the habit of making my own food and taking it to work for lunch to save some $$ and most likely some extra calories. 

I saw a recipe on Pinterest that made a chicken salad but with avocado instead of a lot of mayo.  She made hers with shredded chicken, avocado, mayo, green onions cilantro, lime juice, salt & pepper. 
 
I took one 16 oz can of chicken chunks and shredded it up.  I then diced up one whole avocado and mashed them together.  I sprinkled in some green onions and pepper.  That's it!  Added it over a bed of broccoli slaw and I was good to go!  I absolutely love chicken salad and egg salad so was absolutely grateful to find this recipe sans mayo but just as much creaminess as expected!  Good job 'Becoming Betty' for putting this together!

Saturday, April 7, 2012

Paleo crumble cake

I love when I have time in the morning to bake breakfast.  Most mornings are scrambled eggs, sauteed mushroom, onions and maybe 1/2 of an avocado if I have one on hand.  This morning I had some time so I decided to make a crumble cake that I saw on Pinterest.  While baking, I was jamming out to Jason Mraz... what a great start to a beautiful day.  All the windows and doors are open too!! :)  Love days like this. 

Now, for the recipe.  I found the original recipe here.  Everything the recipe called for I had on hand except for the infamous arrowroot powder.  After doing some research, I found that an equal substitute is Tapioca Flour (also called Tapioca starch... and I just happened to have that in stock in the pantry).  I learned something new today!

I pulled out all the necessary ingredients first:

 For the batter portion, you will need
1/2 C Coconut Milk (I used SO Delicious, unsweetened coconut milk)
2 Eggs (I just used egg whites)
1/4 C Raw Local Honey
1 tsp Vanilla
2 C Almond Flour
1/2 C Arrowroot Powder (I used tapioca flour/starch)
1/2 tsp Baking Soda
1/2 tsp Salt

I mixed the dry ingredients together first.  Added the wet ingredients after.  The recipe that I found said to use a 7 x 9 in pan.  I had a 5 x 7 stoneware piece and that worked just fine.  I did have to bake it a little longer than the original recipe called for.

I needed to make the cinnamon topping next.  I used:
2 tbsp Cinnamon
1/4 C Coconut Oil (or butter)
3 Tbsp Honey
Next time I will probably only use 1 T or maybe 1.5 T. of the cinnamon. The 2 T was quite strong.  I liked the flavor but it was slightly intense. 

I added 1/4 cup of pecans and 1/4 cup of walnuts because I love them both so much!  The oven was set for 325 and the cake was baked for 30 minutes to start.  I pulled it out and put a tooth pick in the middle.  It was still a little wet so I baked it for another 6 minutes.  It came out wonderfully and the smells were even better!

 B cut both of us big pieces and I couldn't finish mine.  I will make this again and it would be great if family was here to share with.  Jason Mraz and my leftover coffee from DD yesterday will have to do for now.  Enjoy your day and happy baking!


Paleo spaghetti and monkfish

B & I went to Seattle, WA in January for a wedding.  We lucked out with the only days of sun WA will probably see all year... and in the winter at that.  :)  We stayed at The Arctic Club and were just a couple of blocks from the water and the Fish Market.  On our last day we walked down to the Pike Street Market and bought a BUNCH of fresh fish to have shipped home for us.  What we learned is they will pack it in dry ice for you in carry-on approved containers so you can fly with your fish!  (Just an FYI for those of you who ever would be doing this.) 

We had 1 fillet of monkfish (aka Poor Man's Lobster) left and still have a couple salmon steaks.  We decided the monkfish would be an excellent lunch-time meal.   I also had one Italian squash & one yellow squash in the house that had to be eaten soon or they would become bunny food (the blessings of having a big-over grown-desert-backyard is that all almost spoiled food can either go in a Vitamix or feed the wild animals).    While B prepared the monkfish on the grill (cook on medium-high heat for about 15 minutes and squeeze about 1/2 of one lime on top and you are good to go), I prepared our side dish of pasta. 

From the pasta:
Use your hand-dandy mandolin or peeler (I used my Oxo peeler to make the squash super thin.)
     and then...
put the "noodles" in a bowl and heated in the microwave for 3 minutes.  This helps get some of the extra moisture in the squash out.  Once the noodles cool for just a moment, drain.  I don't use a strainer since it involves more work (and clean up) than there is liquid that comes out.  However, I have found that if you don't drain the noodles at all, there is way too much liquid in the meal that you prepared the noodles with.  Since I have cut out grains and pastas, Italian squash has become my new best friend when it comes to wanting 'pasta'.  Remember for those of you struggling with letting go of pasta; the flavor you taste from a pasta dish are the seasonings and sauces... most likely not the noodles themselves.  I think you might be pleasantly surprised with how much better you feel by taking the pasta out of your dish... just sayin'. 

I have an absolutely amazing friend who is a fantastic cook.  She went to a local farmers market last week and got a TON of veggies for only $10.  She gave B & me about half of what she received and we were stocked for over a week.  One of the things she shared with me while we were loading the car with all the yummy goodies was how to make an easy 'from scratch' pasta sauce.  She had actually just served us a meal for dinner that night using her homemade sauce so I was totally game for trying it out myself. 
The sauce:
6-8 tomatoes, cut off the tops, slice in half and place face up in a baking dish. 
Add a little salt & pepper over the top of all the tomatoes
Bake at 400 for about 40 minutes.
Dump in the Vitamix (or your food processor) and blend to desired consistency
I added 1 T Italian seasoning & 1 T of basil and blended for about 5 more seconds.
That's it.  :)  Once it cooled, I double-bagged it in a freezer safe gallon-size Ziploc plastic bag and stuck it in the freezer. 

Warmed up thawed sauce & baby shrimp
Pasta sauce, 2 cups baby shrimp and 2 squash


 I use my cast iron skillet to warm up the food from the fridge instead of using a microwave.  It takes out one step and works just as fine. 


The final product.  Don't you worry... it may not be the prettiest foods ever but it sure was oh so delish!